Monday 31 December 2012

From The TipSquirrel.com Archive : Sending images by email from Lightroom


Originally posted at TipSquirrel.com
Photoshop Nut : Michael Hoffman


In the past few weeks we’ve looked at various ways to export image files from Bridge and Lightroom. In fact, in previous tips we’ve even looked at directly exporting to Social Media sites from Bridge and from Lightroom. But, what if I want to send a simple email to family or friends? Surely there must be a quick way to pick some files and send them by email? Of course you can! As long as you are using a true mail client, and not a browser based mail system, you can have Lightroom pass files directly over to the mail client. If you’re a Mac user, you’re in luck. You can create an alias to your email program, and add that as an export action to Lightroom. It’s as easy as 1, 2, 3:
  1. Follow the steps in this Adobe article to create the alias in your export actions folder;
  2. Select hard drive export (see last week’s tip) and configure the options as desired;
  3. In the section called Post Processing, choose your mail alias (see below).
LR-Mapi-01 The photos will be left in the folder where you exported them, but they will be delivered to your mail client and will be attached to a new black message. Easy! If you’re a Windows user of Lightroom, this may not seem to work well, resulting in cryptic error messages. However, there is a great free plug-in called MapiMailer that will do an even better job! MapiMailer takes care of the handoff completely transparently, delivering the images to your email client without leaving files stranded on your hard drive. Sorry Mac users, but this power is reserved only for Windows users... it will take a bit of configuring to set it up the first time, but, hey, that’s what we’re here for at TipSquirrel! If you’d like to set up MapiMailer on your system, here is what you need to do:
  • Download the MapiMailer plug-in, and extract the contents somewhere convenient. The plug-in consists of a folder named mapimailer.lrplugin, and that folder contains all the necessary files.
  • Move the extracted folder mapimailer.lrplugin to the location where Lightroom can find it. This is typically:
Windows XP: C:\Documents and Settings\username\Application Data\Adobe\Lightroom\Modules Vista / Windows 7: C:\Users\username\AppData\Roaming\Adobe\Lightroom\Modules LR-Mapi-02
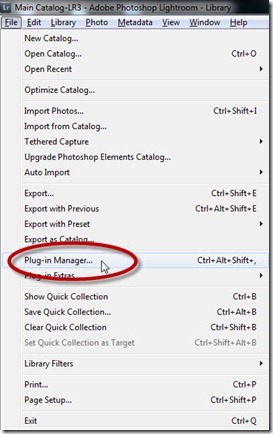
  • Once you’ve placed the folder, in Lightroom, choose File > Plug-in Manager…
LR-Mapi-03
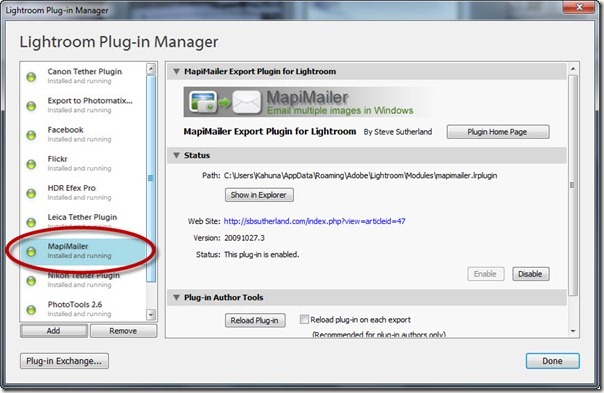
  • In the Lightroom Plug-in Manager, locate the Add button in the left panel and click it:
LR-Mapi-04
  • This will bring up the Browse for Files or Folders dialog, open to your Modules folder from above. You may need to scroll a bit to find it. Select the mapimailer.lrplugin folder that you placed a moment ago and click OK.
LR-Mapi-05
  • That should do it! MapiMailer should now show up in the left panel, with a green light and the status listed as “installed and running.” Click Done to exit the Plug-In Manager.
LR-Mapi-06 Using MapiMailer: OK, now we’ve installed it, how do we use it? It is quite simple and efficient. Start by choosing the images you want to mail, and choose File > Export… or click the Export… button: LR-Mapi-07 
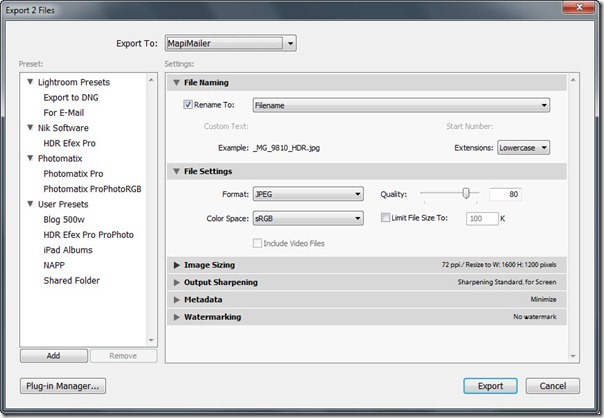
Next, in the Export dialog box, change the Export To: setting at the top to export to MapiMailer: LR-Mapi-08 With MapiMailer set as the Export plugin, you have access to all the same options we saw last week when exporting to hard drive – including the ability to export various file types: JPEG, TIFF, DNG, and even Original. Set these settings as desired and you’re ready to click on Export: LR-Mapi-09 But, keep in mind – we can save these settings also as presets, by clicking the Add button in the lower left. This brings up the New Preset dialog, and we can even create a separate folder to organize our mailer presets: LR-Mapi-10 You can, of course, create several different mailer presets – saving you lots of time in the future: LR-Mapi-11 Once you’ve clicked on Export, the system will launch your default mail client with a new blank message containing the images with the parameters you’ve specified: LR-Mapi-12 LR-Mapi-13 All you have to do is enter the email address and subject, and type your message. As you can see, the photos are already attached. And, as a bonus, MapiMailer cleans up behind itself – the exported files are not left cluttering up your hard drive. I hope you found this tip helpful! Let us know by leaving a comment, we love to hear from you.

Saturday 29 December 2012

From The TipSquirrel.com Archive : The Photoshop CS6 Oil Paint Filter

Originally posted at TipSquirrel.com
Photoshop Nut : Dan Moughamian


Sometimes it's good to take a step back and have a little fun with Photoshop. Try new filters, new blend modes... experiment a bit! Photoshop CS6 offers plenty of opportunity for this with new features like Blur Gallery, greatly improved Lighting Effects, and the new Oil Paint filter, which we'll talk about here. Traditionally most creative or painterly filters end up in the Filter Gallery, but the Oil Paint filter is a new breed. It has been accelerated to take advantage of fast GPUs (or graphics cards) and provides instantaneous feedback as you adjust the settings, and you can find it right at the top of the menu!
Oil Paint - Filter Menu

Smart Oil Paint Filter

As a starting point, it's usually a good idea to convert the layer you're going to work on into a Smart Object (or Smart Filter) layer. In this case, I've given myself a head-start by opening the raw image as a Smart Object. Once you've done that, chose Filter > Oil Paint. Next you'll want to zoom in to at least 33 or 50% on most photos, more so if they're very large. The idea is that you want to see the contrast edges as well as some of the grain and detail in the shot. Oil Paint Filter UI To test things out, move the Stylization control from side to side and watch the preview as you do so; can you see any obvious changes? If not, you need to zoom in at least one more level. The Stylization control has an interesting effect. The best analogy I can make is that the lower values give the simulated oil paint a more random and almost clumpy appearance, almost like it was painted onto a rougher canvas or with an older brush that had lots of dried paint on it. Personally I like oil paintings to have a smoother look so I set this example to a value just over 7 (the max is 10). Oil Paint Filter - Stylization

Brush Controls

The Cleanliness slider has a similar effect to Stylization except that it tends to break up the contrast lines (i.e. simulated paint streaks). The lower the value, the more broken the paint lines appear to be. You might think of boosting this setting  as well however I think it adds an element of realism to keep the value under 5. After all if we're painting with human hands and not robot hands, we're probably going to have an element of waviness to the contrasts we create with a real paint brush, so it should be the same with digital. Oil Paint Filter - Cleanliness The Scale control is pretty important and it's one you'll want to zoom out to evaluate as you make the setting. Think about the relative size the image will be viewed at and try to mimic that level of magnification if you can. The larger the scale, the more obvious the paint patterns will be. Move the slider back and forth a couple times to get a sense for what the effect does. I usually settle on a value between 3 and 7. As with the prior two settings, the max is 10 and decimals are used so the options are fairly precise. Oil Paint Filter - Scale The last brush control is Bristle Detail and you can think of this as mimicking the look of a brush that shows individual bristle lines vs very smooth paint strokes. I usually leave this value quite high depending on the first couple settings. If you make it too low I think it loses the character of oil paint a bit. This is one you'll want to be zoomed in with to see clearly. Even then it can be a little tough. Oil Paint Filter - Detail

Lighting

The Angular Direction control will "rotate" the effect (e.g. moving from 180 to 360 is basically inverting the contrast lines to create the sense that light is shining on the canvas from the opposite direction), while the Shine control will change the oil paint from looking flat to looking wet (i.e. more reflective in the bright areas). Try to rotate the effect so that it runs parallel to the most important visual lines in your image (or specific textures you want to highlight). Oil Paint Filter - Direction The Shine can put the finishing touch on the shot and make the difference between something that looks like paint or not. With these two controls it's generally best to zoom out a bit to normal viewing magnifications. Oil Paint Filter - Wet The final result is shown below. When you're done, click OK to apply the filter to your new Smart Object layer, then double click the filter name (below the layer) any time you want to revise your settings. Tip: Don't forget to rasterize your smart filter layer before scaling your oil painting! [caption id="attachment_14612" align="aligncenter" width="550"] Snow Statue © Dan Moughamian[/caption]

Friday 28 December 2012

From The TipSquirrel.com Archive : Stripy Text with Photoshop Layer Styles

Originally posted at TipSquirrel.com
Photoshop Nut : Simon Rudd


More text antics with Photoshop. We shall try and create this...

  final

Step 1.

step1 Start by creating a new Photoshop Document, I used 1024x768 at 72 ppi, but as always its really up to you. I then set my background Colour to Red #c0292f, you can either just fill the Background Layer with red or create a new Layer and colour that red.

Step 2.

step2 Next reset the Swatches to default by pressing D on your keyboard, follow this by pressing X to swap the foreground and background and make White the foreground colour. Choose the Text Tool and select the font Impact (or anything else big and bold), set the size to 150. Type something on on your screen.

Step 3.

We are now going to add some Layer Styles to our text, you can do this by going to Layer > Layer Style > or by pressing the fx button on the bottom of the Layer Palette. First Choose the Bevel and Emboss style and perform the following actions (most of them are the default styles) step3a Set the Gloss Contour to the preset Ring(bottom row, 2nd in) step3b Next add a Inner Glow, Stroke step3c step3e Finally add a Gradient Overlay as in the picture step3d finally reduce the Fill Opacity of the Layer to 24% step3f

Step 4.

step4 Next we are going to add a new Layer above the Text Layer and fill it with clouds by going to Filter > Render > Clouds. This will generate a random selection of cloud like texture over the picture. Next we want to put a selection around the Text, you can easily do this by holding the Control Key on your Keyboard and clicking the Text Layer. Now making sure you are on your clouds Layer create a new Layer Mask. Layer > Layer Mask > Reveal Selection. Finally reduce the Fill opacity to 30%.

Step 5.

step5 We want to now use the Line tool, set the size to 50 pixels and draw a series of lines across the text as in the picture below...

Step 6

Select all of your stripes layers in the Layer Palette (hold control and click once on each one) and the clip them to the Clouds Layer, Layer > Create Clipping Layer. You can now put things under the text and they will show through... step6 Hope you enjoyed this tutorial :) Please look out for me on Twitter and say hello, also have a look at my website http://www.simonrudd.info

Wednesday 26 December 2012

From The TipSquirrel.com Archive : Holiday Photo Photoshop Clinic

Originally posted at TipSquirrel.com
Photoshop Nut : Richard Harrington

harrington_xmas-clinicJoin Rich as he tackles 12 holiday images. This in-depth class will show you how to fix both standard and advanced problems that often plague holiday photos. With almost an hour of tuition Rich shares some great techniques that will be handy all year!    

Books_Amazon_Harrington

Sunday 23 December 2012

From The TipSquirrel.com Archive : Apply a "Pinch Curve" to Tighten a Layer Mask

Originally posted at TipSquirrel.com
Photoshop Nut : AJ Wood


Howdy & Hello! As Photoshop continues to improve, our digital workflows become more efficient as we replace old techniques with new features. How many of you have embraced the Refine Edge dialogue commands, or the Adjustment & Masking panels? If you've been reading Michael Hoffman's articles here at TipSquirrel there should be no doubt about the usefulness of those improved features. What happens when you're put in front of an older version of Photoshop WITHOUT those cool new features? A smart person has TipSquirrel bookmarked because you never know when you'll need an old school technique. Let's take a look at how to use a "pinch curve" to choke in a layer mask in Photoshop.

 NOTE - I cannot take credit for this technique as it was taught to me by the wonderfully talented master retoucher David Vaught from Vaught Studio.

1. In the image below I have isolated the bottles from the background using a layer mask. You can see there is a halo around the bottles--the white fringe--which is a possibility depending on how the selection was made & layer mask created. In Photoshop CS4 & CS5, you could simply adjust the layer mask by using the Masks panel, and Refine Mask. But what if you're not working with a newer version of Photoshop?


 2a. Start by selecting the layer mask thumbnail of the bottles. With the layer mask selected, goto Image-->Adjustments-->Curves (CMD+M on Mac, CTRL+M on PC). The image below is the "pinch curve" for an RGB image. Applying this curve to the layer mask chokes in the white area--the part of the layer being revealed--effectively reducing the halo.


 2b. The following image is a CMYK "pinch curve" which also chokes in the white areas of the layer mask.


 3. The resulting image with halo reduced. Quick & easy, no new Photoshop features required. My thanks to David Vaught for enlightening all of us with this useful technique.


Saturday 22 December 2012

From the TipSquirrel Archive : Silver and Gold Text in Photoshop Elements


Originally posted at TipSquirrel.com
Photoshop Nut : Janine Smith


A friend asked me, this past week, if I knew of any gold or silver fonts I could tell her of. Naturally, I explained that fonts aren't of any particular color, but are rendered in the color you have selected as your foreground color. In order for the text to look like it’s made of gold or silver, you have to give it some help and add a couple effects. To begin, open a new document and type your text in your font of choice. Try it with different fonts; thicker ones will obviously look different than thinner ones. My friend uses Elements and, I admit, I went to the webs to try and find an Elements tutorial to send her but to my surprise, I couldn't find a thing I could use! So off the Elements I went. This is a super simple, easy peasy tutorial. You couldn't make this hard if you tried, so grab your favorite font and play along! Open a new document (File > New > Blank File or Ctrl (PC) CMD (Mac)+ N) and choose a size, any will do.
Choose your Text Tool, pick a font and type a word. The word I've typed is the name of the type (there’s a great array of free fonts available at places such as DaFont.com)
Next, go to Effects and choose Bevel from the drop down menu. Try them all to see which you like for your project; simply choose one and then hit Apply. If you don’t like it, choose another and hit Apply again.
Now, go back to the drop down menu and choose Wow Chrome. Select the first style, Beveled Edge. This is your basic for silver.
To make it a little more silver and a bit less chrome, make a Hue/Saturation Adjustment Layer… …and check the Colorize box. Slide the Hue over to the blues and lower the Saturation level.
For the gold tone, you’ll also go to the Hue/Saturation Adjustment Layer and tick the Colorize box, this time bringing the Hue into the yellow range. Adjust the Saturation to the tone you like.
That’s all there is to it!  A very simple, basic way to make a classy siver, gold, or even chrome text!

Friday 21 December 2012

3 Mixer Brush Border Effects

Originally posted at TipSquirrel.com
Photoshop Nut : Gavin Hoey

  3 Mixer Brush Border Effects by Gavin Hoey The mixer brush is one of those tools which, as a photographer, I’ve hardly used since it appeared in Photoshop CS5. If you’re an artist that paints, then the mixer brush is a brilliant tool but it can also be used to create simple painted borders even by someone like me who will never be able to draw or paint in the real world.

Thursday 20 December 2012

From the TipSquirrel.com Archive : Taming your Photoshop Presets

Originally posted at TipSquirrel.com
Photoshop Nut : David Asch

Before and after image showing an overweight presets panel and a trimmed down version Do you suffer from unsightly, bulging panels? Are your pickers bursting at the seams? Would you like to shed a few hundred items but still be able to enjoy a healthy choice of custom presets?

Wednesday 19 December 2012

Hard Restoration, Easy Fix in Photoshop

Originally posted at TipSquirrel.com
Photoshop Nut : Janine Smith

The first thing you may think as you look at today’s before image is “How in the world am I going to get all of that red-colored mess off?” Or it may not be, but for the sake of argument, we’ll just say it is. Here’s what you need to do to fix this. Pay attention to all the steps, here… Go to your Adjustments panel and choose the Black and White adjustment. Since this is a red-colored mess we’re dealing with, go to the High Contrast Red preset. Now select OK. Did you get all that?
Obviously from looking at the image you can see I’m not funning you! Sometimes it really is just that easy, especially when the problem area is distinctly a red, blue, yellow or green tone. If nothing else, this article should serve to show that it’s an area that should be checked, especially in a photo that was originally black and white or one that you’d be ok with being converted to B&W. Since this article is so short it barely warrants the description “article” (“check out my paragraphs on tipsquirrel.com!”), I’ll go ahead and go over the very few other steps I took to finish the image. I don’t care for straight-up black and white or greyscale. I think all images look better with at least a little color tone to them and the person to whom this image belongs wanted the finished image to have something like the original color, so I sampled a portion of the frame that had a color I thought might look good. I then made a new, blank layer and filled it with the color. Since the color you just sampled should be the foreground color, use keyboard shortcut Alt or Opt + Backspace to fill.
Now go through the layer blend modes to see how each one affects the fill layer. I liked how the Vivid Light mode looked both in terms of what I’m going to do later and the brightness and clarity of the image itself with it applied.
Next it was just some simple clean-up of the cracks using, mostly, the patch tool with some healing brush. I worked in the 200% - 300% zoom range to make sure I was getting everything and not leaving any smudges or artifact behind.
You may notice the insignia on the hat is a little clearer in the last version. The client requested this if I could arrange it. He told me specifically what it was, so I went online and found an image of the insignia which I then separated from the background, re-sized to fit the area, used a Soft Light Blend Mode to help integrate it with the original, and brought the Opacity down to around 17%. Now all that’s left are a few details like replacing the frame and taking down the color just a tad. To do this I simply made another Black and White Adjustment Layer, kept it on the default preset and brought down the Opacity to 25%.
Kind of amazing how an image that looks so bad at first can be improved so quickly and easily, isn’t it? I do wish they were all this easy!